


How do I use Orton pyrometric cones?
Orton Pyrometric Cones measure "heatwork" and are an invaluable firing tool. They are small pieces of clay resembling tall pyramids that are made from precisely formulated materials.
See the Orton YouTube channel for useful How-To videos: https://www.youtube.com/@OrtonCeramic
IMPORTANT! Do not confuse cone numbers with a 0 (zero) with those without. Cones prefixed with a 0 (zero) are for low temperature firings, cones without are for high temperature firings.
During production, cones are formed in pairs so they need to be gently and carefully separated before use: https://www.youtube.com/watch?v=9nSGWmDrYcE
A brief explanation of "heatwork"
The effect of temperature and time together is called heatwork. Temperature alone only tells half of the story. To understand the ceramic firing process, it is essential to grasp that the time taken to carry out a firing has nearly as much bearing on the end result as the temperature. For example, if two identical pieces are fired, one taking eight hours to reach temperature, the other only six hours to reach the same temperature, the results will be very different. Even though the same temperature has been achieved, the shorter firing has not “cooked” the piece for long enough, i.e. it has not had enough heatwork.
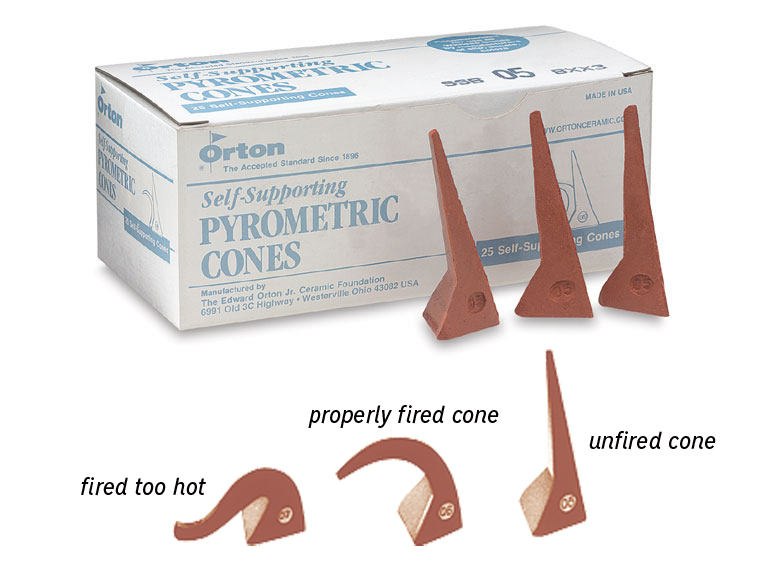
Our recommendation is to use Self-Supporting Cones which are the most accurate and easiest to use witness cones available. They provide the same information as Orton Large Cones. The advantage of Self-Supporting cones is that they are the correct height (1 3/4" exposed above the base) and have the 8 degree bending angle built in. They do not require plaques. Self-Supporting cones can be set on any flat surface.
Cones soften and bend when the exact amount of heatwork has been achieved; there are many different values covering a large temperature range. A self-supporting cone has been fired correctly when the tip is parallel with the top of the 'buttress'.
Cones have temperature values that assume a constant heating ramp for the last 100c of the firing, e.g. 60 or 150°C per hour. For example, the self-supporting cone 06 has a value of 998°C if fired at 60°C per hour; however, if it is fired at a ramp of 150°C per hour, the top temperature needs to be 1013°C to achieve the same results. The slower rate of heating will “bake” the work more.
Only the temperatures during the last 100c affect the cone; during this period the rate of heating will be slowing down whatever the ramp rate set on the controller. Kilns cannot maintain high rates of temperature increase because heat loss from the kin increases as the temperature rises; a heating ramp of 200°C per hour from 600°C will for example soon begin to slow down and at 1200°C may be in the region 100°C per hour and at 1280°C it will be more likely to be something like 10 to 15°C per hour. To correlate controller to cone accurately you must monitor the actual speed achieved for the last 100 degrees. It is useful, if not essential, to use cones when first establishing new programs in your controller, as a cone will give you a measure of the heatwork actually achieved in the kiln. Once you have established a program that puts the appropriate cone down then the controller will replicate it for each firing.
Cones are also used to diagnose problems in the kiln, particularly they will identify unevenness of temperature throughout the kiln. It is easier to interpret cones if you use three different values, one at the desired temperature/heatwork, (the Target cone), the next one lower value (the Guide cone) and the next higher value (the Guard cone).
